Video editing is hard work. It’s a very creative process, and can take hours and hours no matter how good you are—and that’s assuming you have a computer that’s up to the job.
Whether you’re building a YouTube studio, or want to make your video footage more cinematic, these 10 tips are sure to speed up your workflow. From performance tricks to workflow improvements, there’s something here for everyone!
1. Playback Resolution
This first tip is a simple one. Rather than previewing your edit in its highest quality, it’s possible to reduce the quality up to 1/2 or 1/4 for HD footage, or 1/8 or 1/16 for 4K and above footage.
This reduces the burden on your system, and has no impact on the final video quality.
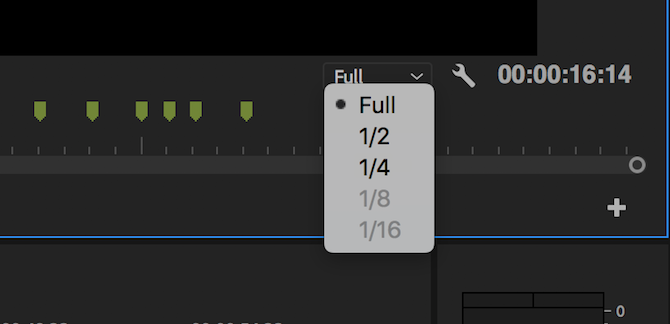
On the bottom right of your Program Monitor, choose the Select Playback Resolution box. These options will reduce the preview quality accordingly. If you’re editing 1080p footage, you won’t be able to select any setting lower than 1/4.
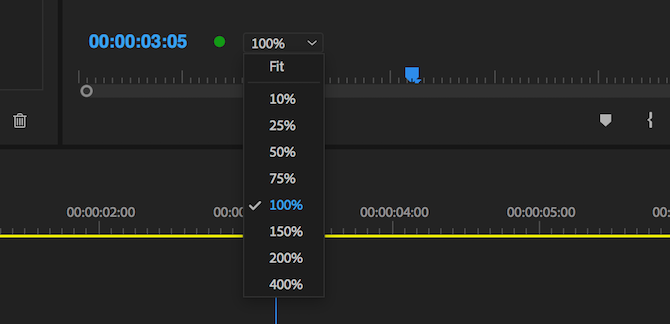
2. Playback Zoom Level
Premiere Pro provides a huge number of playback zoom levels and clip scale settings, but sometimes these can actually reduce performance.
On the bottom left of the Program Monitor is a Playback Zoom Level control. This adjusts the size of your playback monitor. You can set this to 100 percent, or a larger or smaller percentage. You may want this larger if you’re working on a small screen, but if you have the resolution to spare, setting this to a smaller percentage results in a marginal performance increase.
Another feature you can adjust is Scale. If you’re working with a 4K clip on a 1080p timeline, then you’ll need to scale or “zoom out” the clip to ensure it is all visible. While there’s nothing wrong with this, it does require more processing power, so consider shooting everything in 1080p to begin with, or transcode your footage, as shown below in the “Transcode Footage” section.
The Scale control can be found in the Effect Controls panel, underneath Motion.
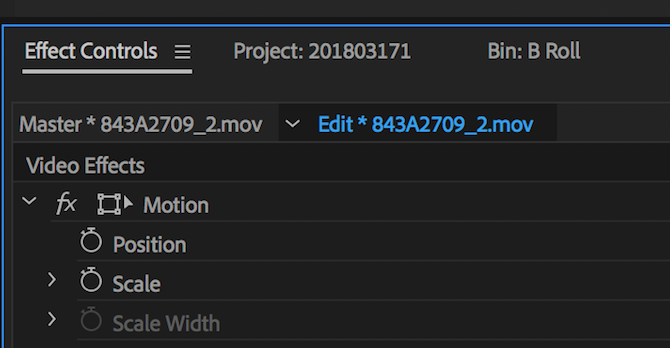
If you don’t see the Effect Controls panel, you can enable it by going to Window > Effect Controls.
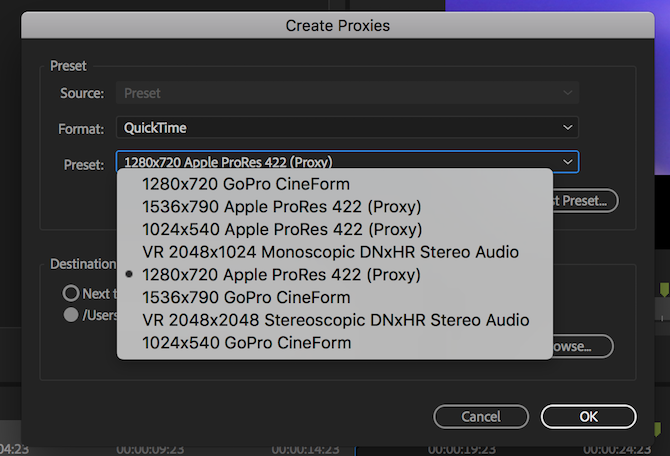
3. Use Proxies
Proxies are a great way to squeeze more performance out of your system. Proxies in Premiere Pro are simply a different set of files for editing and the final render.
If you’ve shot a film in 4K or higher, but your computer cannot edit 4K smoothly, you can work with reduced quality, 1080p or less proxies, which then get “swapped” out by Premiere for the final render.
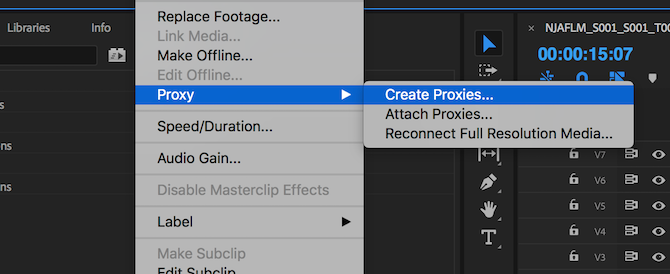
To create proxies, right click on a clip in your project browser, and choose Proxy > Create Proxies.
From the Create Proxies menu, you’ll be able to choose a file format and proxy location. Choose something like GoPro Cineform or Apple ProRes, and then hit OK. This will open the Adobe Media Encoder, which will automatically render all of your selected clips into easy-to-edit proxy files.
Finally, you can add a button to toggle proxies on or off into your Program Monitor Toolbar (the buttons underneath your video preview).
Start by choosing the Button Editor button on the bottom right of your preview window.
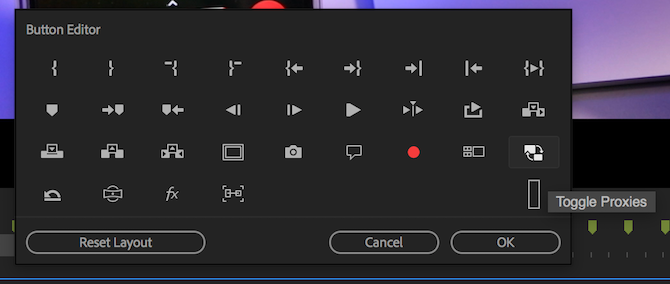
Drag the Toggle Proxies button onto your toolbar and exit the button editor. Now, whenever your press the proxy button, it will turn blue, and proxies will be used. Press it again to use your original media. However, Premiere Pro will automatically use your original media when rendering, so don’t worry about losing quality.
Speed Up Video Editing In Premiere Pro
These tricks show that little changes here and there can add up to big gains over a whole edit. From transcoding to keyboard shortcuts and everything in between, these tips are surefire ways to increase your edit speed in Adobe Premiere Pro!
Once you’ve learned these basics, why not learn how to master time remapping in Premiere Pro, how to use the color match tool, and make your own presets?
Comments
Post a Comment